Thursday, October 27, 2011

Fulfilling My Watercolor Artwork Dream

I love to draw, eversince I was a kid. Just paper and pencil drawings. I don't excel in it, but I feel that I have a passion for it. When I was in college, I really wanted to take art lessons. How I wished to learn painting with watercolors and oil pastels back then. But sadly, money wise, I got no opportunity. After a few years, the desire to take painting lessons came back when I get to pass by an art studio everyday on my way to work. I took the time and effort to inquire, but schedule won't permit and for practicality reasons, it was not on the top of my financial priorities. So, I had to force myself to just let it go.

Recently, as I was buying some craft supplies, I decided to buy a watercolor palette and some brushes. I really do not have any background on watercolors, but the desire to do it and do it now was so great that I finally found myself doodling and coloring. And here is my first ever watercolor artwork. It is now a page in my art journal.
The following day, I made another one again. I framed it and it is now hanging in our wall.

Hopefully, with more practice, I could make a better one and can directly paint without pencil outlines. Hmmm... how do you do that? I really wanna know!

Saturday, October 22, 2011

Embellishing, Recycling, Thrifting

Embellishments can really bring life to something (in real life and crafting). It does not only make it beautiful, but it also makes it become more interesting and fun. I realized this when I was embellishing recycle-able materials like boxes, various cans and empty beauty product containers. I am organizing my little craft table/area, so I need storage for my craft supplies. Photos below are what I have made so far.

This box is for my postcards and used postage stamps collections. I think that using stamps for the decoupage is just perfect for the project. Like, if I need a postcard or a used stamp, I will just have to reach for this particular box.


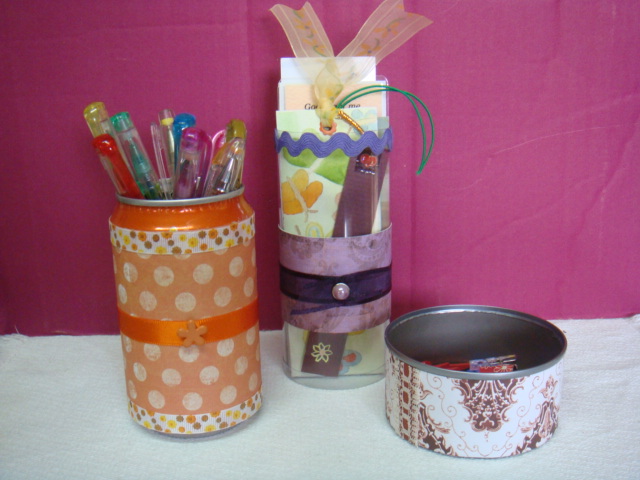
Next: The orange one is a Royal Tru-Orange soda can. Just a couple of ribbons, a brad and a scrapbook paper were all it took to transform it. It is now my beautiful glitter pen holder. The tall one in the middle hold my bookmarks. The plastic container was from a set of underwear. It looks like glass from afar and it's so pretty beside my books! The third one was a can of flaked sardines. I love the print of this scrapbook paper, so I just added a little trim to accent it. This one holds all sorts of clips (binder clips, paperclips, etc...).
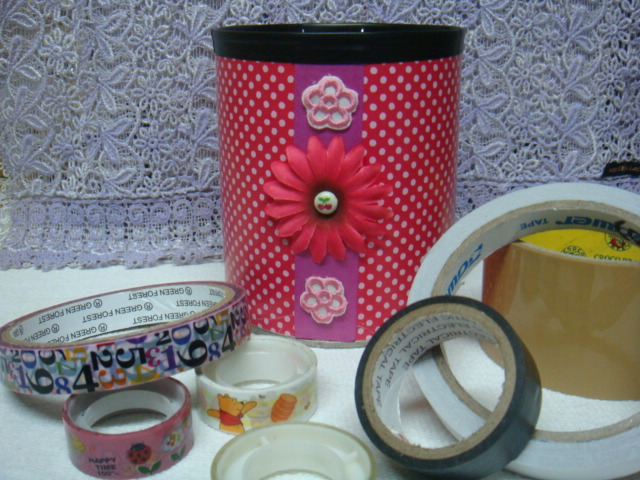
This is also a tin can and it now stores my adhesive tapes.

Adding this:

It turned out so lovely!
Some more! These ones are not related to my craft supplies organization though.

This is an empty facial cream container. I am always hesitant to throw these kind of things because I know that they are still useful in some ways. This, I recycled to be my talcum powder puff container (and the puff fit perfectly)!
Finally, the simplest of all! I am using this as a tea light candle holder, which I placed in the window above our kitchen sink. It was also a facial cream container and it was so plain that everytime I look at it, it seems to blankly stare back at me! So, I looked at my sticker stash and found some plastic transparent ones that has quotes on them. The quote is nice and the sticker fit just right!

So, from this:
To that!

They are all very simple projects, but I love them!

Linking to these parties:
BWS tips button

Thursday, October 20, 2011

Measuring Spoon & Cups Holder

I am very new to baking and I feel the need to surround myself with little notes about important details related to it. When I need some measurement conversions, I had to use the conversion application in my phone (I even use it for the timer since my timer broke down). It is really fine though, but sometimes, when I need to check something and my hands have flour or batter, I feel its inconvenience.

I had this measurement conversion printed when I joined a swap in swap-bot and the lady I had to send to love owls. It was cute so I printed one for for myself too.
Now that I need it, I want to hang it by the wall for easy reference. My first plan was to frame it in a wooden frame. I wanted a wood frame so that I can attach some hooks to hang my measuring cups and spoons. Since I don't have that frame on hand and I am practicing frugal living, I searched my recycling stash for something that will make do. And this is what I found. A cheap plywood wall hook and some wooden sticks (from the Desiderata scroll... the one I framed).
I just covered the board with a patterned paper and decoupaged the printed conversion on it for a laminated effect. The piece of cork was once a stand for a picture frame (I had the frame up in the wall so I took off the stand). I also covered the stick with a different paper for emphasis. Then screwed some hooks on it to hold my measuring cups and spoons. I used a wire to hang it. And this is how it turned out!
I also have this small temperature conversion (I really need it!) that I clipped from a food magazine and some stickers with baking theme.
Since the clipping is really small, I just decided to attach it to a scrapbook paper, stick the stickers around it, then brushed the whole thing with a transparent glue. The clip stand has not been used since a long time ago and now it has found its new partner!

Linking this project to:

Wednesday, October 12, 2011

Wrist-rest!

I saw this onesie in a rummage sale a couple of days ago. It caught my attention because of the image of the sailor bear peeking out from among other clothes, I immediately thought that maybe there is a lighthouse image along with it (I collect anything with lighthouses on them) so i picked it up, and viola the lighthouse said hello!
Back to the onesie, it was really really cheap so I bought it. A recycling idea came to mind and it was to cut the square image and maybe make it as an applique to a throw pillow cover. Then I remembered I saw a sample of a wrist-rest for the computer mouse and the size of the image would be perfect for the size of a wrist-rest. So, I decided to make it. I stitched a border around it in a red thread to add a little more style and color.
I should really get myself a portable electric sewing machine! I have so many projects in mind that needs a lot of sewing.

Linking to these wonderful blog parties:
Stinkin Cute Thursday Button

Monday, October 10, 2011

DIY Neck Pillows

I am having a stiff neck! At first, I thought it was due to my sleeping position or my pillow. But then, it may be due to my recent crafting activities, which was A LOT of decoupaging. I think I kind of strained my neck! I searched for some home remedies in the internet and it brought me to this suggestion, the rice therapy bag/pillow to relieve neck pains.

A couple of days ago, I bought this curtain for kitchen doors from a second hand rummage sale. I don't need it for that purpose but I like the print and I thought of making a throw pillow cover out of it since the idea of throw-pillow-cover-making has been hovering at the back of my mind for quite sometime now.
Anyway, I already cut the fabric in half before I saw the rice therapy bag project, so I decided to make one throw pillow, a small rice therapy pillow and a neck pillow. I'm still going to work on my rice therapy pillow (but I have used it already and it was very effective). I want to embellish and prettify it with ribbons but I ran out of ribbons at the moment (because all of it are still in my hometown). Good thing I got a couple of ribbon scraps on hand for the other two pillows.
I made another neck pillow. This was a table napkin that I bought from a thrift store about six years ago. I bought it because of the design. I just love the girl swinging on a tree branch!
I don't have a sewing machine so I hand sew all of them. Yes, it was so tiring because I did a lot of backstitches! But they turned out alright and I am loving them!

Friday, October 7, 2011

DIY Decoupaged Coasters

Still in decoupaging mode! This project was also inspired from another blog hopping day (I am so sorry I cannot recall from which blog). I bought this set of wooden coasters for DIY projects. My original plan was to wrap them with different scrapbook papers since I don't have similar designs enough for the four of them. But when I saw this project, I thought it looked better to leave a small portion on each sides blank (like a margin) and I can just use one scrapbook paper for a matching coasters.


Wednesday, October 5, 2011

Decoupaged Bin Trays

I found this great recycling idea from blog hopping and it kept me busy crafting for almost a week! I also realized that this project is what I have been saving those boxes, milk and cereal cartons for.

Take out one side of the carton...
Decoupaged cut out magazines and seal the top with an electrical tape...

So, where and how will I use them? Hmmm... (tapping fingers on the table)... yeah right, here! Oh my, this is embarassing! But yes, this is my vanity area and they are so cluttered! I am still waiting to have a dresser or a vanity table so, I guess, I am still letting this area on a free style mode. Maybe until then.

I think this project is just perfect for now. The bin trays made a perfect organization solution. They grouped similar items together and made everything neater. What a great recycling project! I was so into it that I made another and another and another! I think I strained my neck!

I also made this cute little box!