Showing posts with label frugal living. Show all posts

Friday, April 24, 2015

Instant Spring In Our Garden

This time last year, my garden were full of blooms from my orchids, petite mini roses and other flowering plants. I have marveled in their beauty and they inspired me a lot to garden more. This year however, they seemed to have fallen asleep. Last year, it was like there was a springtime in our garden. Here in the Philippines, we do not have what is called the Four Seasons. Although I think we do have it, just not acknowledged like the way other countries do. For instance, during this time of year, flowers are also in blooms. Isn't that spring time? Then, there's summer where the heat is unbearable. Around August, leaves from trees keep falling off. Isn't that what they call the Fall season? We have never experienced snow, but around Christmas time until February, the temperature is unusually very cold. So, I guess, in a way we might have it.

These flowers I recently bought gave our garden an instant springtime feeling though.

Pretty in Pink Roses!
When I was younger, I thought the color Pink was too "little girly". I favored the color Yellow then, the butter yellow shade or the pastel one. As I reached my 40's, I cannot remember however, what triggered my sudden interest to Pink colored things. I guess, it's true what they say, "Life begins at 40"!

Anyway, at the farmer's market today, I saw this beautiful Pink Rose for sale. I normally buy the petite mini Roses ones, but I was kind of drawn to this one. For one thing, it is Pink and it looks so pretty! And those buds, would they just be so lovely when they open up! Also, the vendor kept lowering the price (I had to smile remembering it). From 180 pesos, she lowered it to 160. I asked if I could get it for 150, as well as 50 for the petite mini in Golden Yellow originally priced at 70, then 60. 200 pesos for the two. She said okay. Although it was another impulse buy with a feeling of guilt on the side, I still went home happy!

I really do not give justice to things with my photography. I do my best to get their best shots, but I guess my best wasn't good enough. Hahaha.


Millionaire's Flower
Isn't the color lovely? I always like to have this flower, however it was kind of expensive. But not, I just found out, when it is sold in a farmer's market! It also came with free lecture on how to care and propagate them. Isn't it great! :)


Just including my frugal/recycled/re-purposed garden project. The tin kettle had holes in the bottom already, so its time for it to be re-purposed as a planter for my begonias. The teacup and the mugs had broken handles. I grouped them together for that coffee/tea theme.


My orchids, this time last year.


Joining the blog parties at:

Home and Garden Thursday
Sweet and Simple Fridays

Wednesday, June 11, 2014

Recycled Orchid Label

I just posted a thread in an orchid forum about my recycled idea for an orchid label. The other members seemed to like the idea and I'm feeling so happy! :) Okay yes, even kinda proud of myself!

I just found a recycling idea for those little expiry date or tags from my bread purchases. I save them for future use and this time I found a use for them. The rubber bands are also recycled. They came from the vegetable bundles I bought from the market.


Monday, July 29, 2013

DIY Nail Art!

Four Sundays ago, I gave my nails a "nail art" treat. I don't go to salons for manicure or pedicure, so I have to "DIY" my nail art. So far, the easiest design that I can think of and believe I can do was polka dots.

Feeling young on my 4oth, I bought a Lavender color (First Crush by Caronia) polish. I have Pink polish already and I planned to combine the two colors.


Second time was the Red one with the White Tulip-like design. I really don't know what to call it (lol).

My third design was inspired by Candy Crush. I saw it as one of the backgrounds in the game. So I bought a metallic Pink and metallic Blue polish. I first applied the Pink ones and while waiting for it to dry, I realized that the Pink on Black looks really cute... sweet Pink on a witchy Black nails. So, I am calling it Sweet 'n Witchy! I will have that design next week though, since my toenails are done with the Candy Crush design already.


I just love this article, 5 Nail Polish Colors Every Girl Should Own!

Linking to:

Wednesday, June 12, 2013

Thrift Store Shopping!

There was an art frame that I have been eyeing in a thrift store that I always pass by whenever I go to the city. But finances has been really hard after my surgery and I cannot afford to buy unessential things. So, to avoid the frame, I did not go into that store. But then, I still happened to pass by a new thrift store and well, the very curious me went inside. I have seen a lot of things I really wanted to buy but I was able to say NO to them (kinda proud of myself there!). However, these cute little dessert plates just seems so hard to resist! I could use them right?!... and they are really cheap... and if I did not get them, I might always think of them and regret not getting them. It always happen to me, I am not usually into impulse buying so when I see something that I like, I don't buy it right away. I go home and if I think of it and if I really want it, I will get it the next time I go to that store, but when I get there, the item is gone already. For only 74 pesos, I got these plates! I so love the Pink one! I always love things with kitschy images!

This is a Gisela Graham plate. Pretty isn't it?!


And this one is Baskin Robbins and it featured Snoopy! I also love the color!


Peter Rabbit by Beatrix Potter design!


This one I like for the Pepper prints and I need a serving plate in this shape and size. Why do I feel like I sound so defensive?! hahaha...


Linking to blog parties:

http://www.thethriftyhome.com

Friday, August 10, 2012

Longganisa Fried Rice

It's frugal Friday today! This time I am featuring my dinner (I'm eating alone) from some left-overs. I have about a cup and a half of steamed rice and two pieces left-over of Longganisa, a Philippine sausage. It's garlic flavor and it is really yummy! I usually save the garlicky oil that it produced to flavor fried rice. So, for this dish, I am copying the Chao Fan fried rice of a local Chinese fastfood. Well, eating alone can also be fun!


Ingredients:

1 1/2 cup steamed rice (left-over)
2 pcs. Longganisa (Philippine sausage)or Chorizo in Spanish
1 egg, scrambled
2 cloves garlic, minced and browned
1 tbsp sesame oil
2 tbsp Longganisa oil
salt and pepper to taste
chopped parsley

How I made it:

1. Crumble one piece of Longganisa. Set aside.
2. Scramble one egg. Then slice it into small cubes. Set aside.
3. Saute steamed rice in minced garlic and Longganisa oil.
4. Add crumbled Longganisa and mix well. Add scrambled egg.
5. Add salt and pepper to taste. Mix in sesame oil.
6. Slice the other Longganisa into thin slices.
7. Garnish with chopped parsley.

Monday, February 6, 2012

Booksale Finds!

Recently, I find myself wanting and planning my very own recipe book. The recipes that I would include are those that I have cooked already, so I am thinking of making an art journal type wherein I will just print the recipes on the printer then paste them on a cardstock. I think I'm a little lazy to hand write everything right now! I hope I can start on it real soon, well, as soon as I decide how I would finally do it... on a ring binder or on a binded notebook! Decisions, decisions!

Since, I was looking for ideas on DIY recipe books over the internet, I also found myself obsessing with cookbooks. A trip to the booksale gave me these three great finds! They are second hand books but they are in great shape. Well, the Campbell, being vintage, seems to have seen some better days.

I am so happy when I found this Campbell cookbook. It's vintage and it's red! A real great buy, only 35 pesos!
Linking to blog parties:
abc button

Wednesday, January 18, 2012

Rummage Sale Great Buy!

I dropped by a rummage sale last weekend and I found this awesome belt... a Nine West one! It was a synthetic one but for its worth, I got it for a very cheap price... uhmmm, even way too cheap! This is now one of my greatest thrift store finds! I love it! Makes me want to go thrift store hunting now again! What a great way to save a lot of money!

Linking to:

http://www.thethriftyhome.com

Saturday, October 22, 2011

Embellishing, Recycling, Thrifting

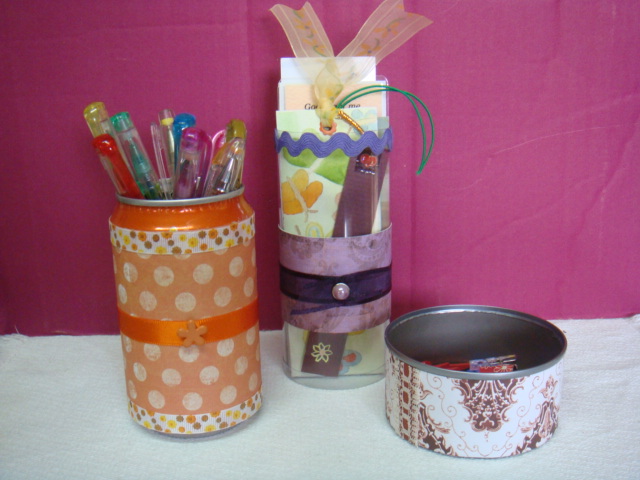
Embellishments can really bring life to something (in real life and crafting). It does not only make it beautiful, but it also makes it become more interesting and fun. I realized this when I was embellishing recycle-able materials like boxes, various cans and empty beauty product containers. I am organizing my little craft table/area, so I need storage for my craft supplies. Photos below are what I have made so far.

This box is for my postcards and used postage stamps collections. I think that using stamps for the decoupage is just perfect for the project. Like, if I need a postcard or a used stamp, I will just have to reach for this particular box.


Next: The orange one is a Royal Tru-Orange soda can. Just a couple of ribbons, a brad and a scrapbook paper were all it took to transform it. It is now my beautiful glitter pen holder. The tall one in the middle hold my bookmarks. The plastic container was from a set of underwear. It looks like glass from afar and it's so pretty beside my books! The third one was a can of flaked sardines. I love the print of this scrapbook paper, so I just added a little trim to accent it. This one holds all sorts of clips (binder clips, paperclips, etc...).
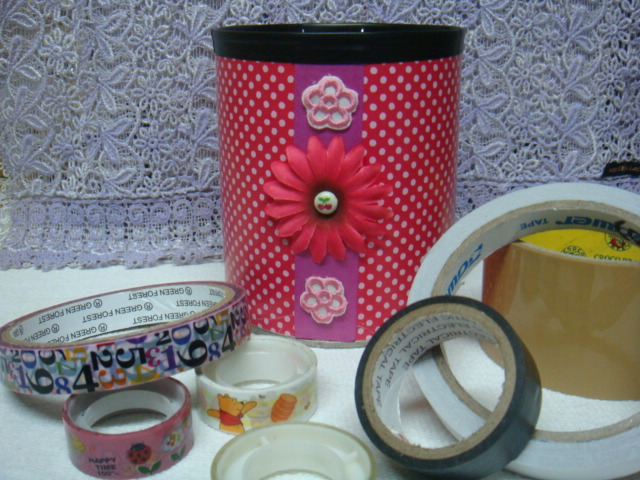
This is also a tin can and it now stores my adhesive tapes.

Adding this:

It turned out so lovely!
Some more! These ones are not related to my craft supplies organization though.

This is an empty facial cream container. I am always hesitant to throw these kind of things because I know that they are still useful in some ways. This, I recycled to be my talcum powder puff container (and the puff fit perfectly)!
Finally, the simplest of all! I am using this as a tea light candle holder, which I placed in the window above our kitchen sink. It was also a facial cream container and it was so plain that everytime I look at it, it seems to blankly stare back at me! So, I looked at my sticker stash and found some plastic transparent ones that has quotes on them. The quote is nice and the sticker fit just right!

So, from this:
To that!

They are all very simple projects, but I love them!

Linking to these parties:
BWS tips button

Thursday, October 20, 2011

Measuring Spoon & Cups Holder

I am very new to baking and I feel the need to surround myself with little notes about important details related to it. When I need some measurement conversions, I had to use the conversion application in my phone (I even use it for the timer since my timer broke down). It is really fine though, but sometimes, when I need to check something and my hands have flour or batter, I feel its inconvenience.

I had this measurement conversion printed when I joined a swap in swap-bot and the lady I had to send to love owls. It was cute so I printed one for for myself too.
Now that I need it, I want to hang it by the wall for easy reference. My first plan was to frame it in a wooden frame. I wanted a wood frame so that I can attach some hooks to hang my measuring cups and spoons. Since I don't have that frame on hand and I am practicing frugal living, I searched my recycling stash for something that will make do. And this is what I found. A cheap plywood wall hook and some wooden sticks (from the Desiderata scroll... the one I framed).
I just covered the board with a patterned paper and decoupaged the printed conversion on it for a laminated effect. The piece of cork was once a stand for a picture frame (I had the frame up in the wall so I took off the stand). I also covered the stick with a different paper for emphasis. Then screwed some hooks on it to hold my measuring cups and spoons. I used a wire to hang it. And this is how it turned out!
I also have this small temperature conversion (I really need it!) that I clipped from a food magazine and some stickers with baking theme.
Since the clipping is really small, I just decided to attach it to a scrapbook paper, stick the stickers around it, then brushed the whole thing with a transparent glue. The clip stand has not been used since a long time ago and now it has found its new partner!

Linking this project to:

Wednesday, October 5, 2011

Decoupaged Bin Trays

I found this great recycling idea from blog hopping and it kept me busy crafting for almost a week! I also realized that this project is what I have been saving those boxes, milk and cereal cartons for.

Take out one side of the carton...
Decoupaged cut out magazines and seal the top with an electrical tape...

So, where and how will I use them? Hmmm... (tapping fingers on the table)... yeah right, here! Oh my, this is embarassing! But yes, this is my vanity area and they are so cluttered! I am still waiting to have a dresser or a vanity table so, I guess, I am still letting this area on a free style mode. Maybe until then.

I think this project is just perfect for now. The bin trays made a perfect organization solution. They grouped similar items together and made everything neater. What a great recycling project! I was so into it that I made another and another and another! I think I strained my neck!

I also made this cute little box!